
Wishing all of you Love, Peace and Joy!! Have a Blessed Christmas!!!
..... 3 more dormice to dress!! LOL


 This is one of the most interesting quilt that I have done! I used the same border fabric for the kaleidoscopes. I think most of the kaleidoscope quilts are like that or else you can't see the kaleidoscope effect! This quilt size is 92 x 100. Ermmm....How am I going to find time to quilt this??? LOL
 Tried putting a few of the pieces together to see how the quilt look. No time to actually lay all the pieces on the floor to see the big picture. If I do that, I might as well sew them!! So I am still finding time to do both at the same time!! I think I have to put Lynda's quilt away. Didn't do much quilting on it!! Christmas is coming and I need to do a bit of 'spring cleaning' in my sewing room!! LOL


 I've made all the pieces for this quilt. The next thing to do is to lay them out before the final piecing can be done. This is because almost all the kaleidoscope blocks have slightly different color tones. Some have more red in them, some more pinks, some more greens! Just for info, there are 1632 triangles in this quilt!!! LOL
 This one is also very pretty! I would like to show off all the blocks but there are 173 of them! LOL If you have not tried making a kaleidoscope quilt, I hope this project of mine will inspire you!! I have to finish piecing all the Honey Bee blocks before I can carry on with this project. Last Monday, I managed to find the remaining fabrics to complete this project. Can't wait to finish this quilt!!!
 This is one of the blocks I've done. It is interesting how a single fabric can have so many different patterns once you stack, cut and sew them together!! For this quilt, I made 173 blocks already and each one look different. Although there are so many blocks to sew, I finished sewing the blocks in just a few days because I can't wait to see how each of the individual block turn out!!
 If you read my first posting in my blog, I mentioned I have a Stack N Whack project just waiting to be finished! This is my first project using this pattern. I went with my sister to a workshop in May. I picked this Christmas fabric. The cut is at a 60 degree angle and the triangles are 3 inches. Before cutting the fabric, you have to find the repeat of the pattern before deciding the degree angle and the triangle size. Then you have to stack the material on top of each other. For my pattern, I have to stack 6 layers.
 I saw Quayquilter's Honey Bee quilt and was very taken with it!!! It's very beautiful. So I thought of adding this quilt pattern into my collection. I contacted Quayquilter and she told me that I might find the Honey Bee pattern online which I did through this website(www.mccallsquilting.com). As for the other applique blocks, I will just look through some books and magazines and hopefully come up with something!! These are the fabrics I bought for the project.
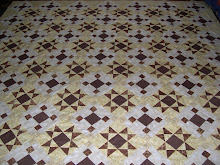
 This is Haminah's quilt. She completed it today. I like the way it turned out! Soooo sweet! The Cross Country blocks bring out the color of the quilt. It is interesting to see quilts of the same pattern but made with different color combination. Does anyone out there have the same quilt pattern?? Would really love to see your masterpiece!!! LOL
 I've added eyes, nose and whiskers for the dormouse. The original pattern has a tail but I didnt want to make it because it will be covered by the dress eventually. I dont see the need to make it!! I've seen the tail and I can tell you it's a big job to stuff it!! LOL.. I think all of us do that sometimes..change a bit of the original pattern!!


